Let’s get your first pair of filters playing. Pick a few recordings you know well: a voice you recognise immediately, a bass line you can hum, perhaps that live album where you know exactly when someone coughs. Those will be useful once the measuring is done.
Your first DecayCore filter
- Download and extract DecayCore.
- Open DecayCore.
- Measure Left and Right with DecayCore’s guided workflow to include RT60 and harmonic data.
- Select Automatic, Asymmetric, and the balanced goal.
- Press START.
- Check the warnings and selected result.
- Export and load the filters into your convolver.
- Listen to familiar music. Keep the comparison level-matched. Do not keep a filter just because its graph looks better.
Need more detail? Use the Measurement guide, Installation guide, or the complete User Manual.
Detailed steps
Before you start
You need a calibrated measurement microphone, a way to play the measurement sweep, and a playback system that accepts FIR convolution filters. Download the packaged release for guided measurement and Automatic mode. Give yourself a quiet stretch of time; the microphone will happily include the dishwasher in its assessment of your system.
1. Download and open DecayCore
- Download the package for your operating system from GitHub Releases.
- Extract the archive and start DecayCore.
- If the browser does not open, go to
http://127.0.0.1:8080.
See the Installation guide for platform-specific steps or source installation.
2. Measure your speakers
Use the guided workflow on the Measure page whenever your platform and audio routing support it. It captures RT60 decay data and harmonic distortion along with the speaker response. That gives DecayCore measured evidence about how long the bass hangs around and where extra boost deserves caution. The woofer gets a say before anyone orders another few decibels.
- Connect your calibrated microphone.
- Load its calibration file.
- Measure Left and Right separately.
- Save the session and press Use final measurements to apply the results. Keep the accompanying session files beside the WAVs so the saved RT60 and harmonic data remain available when you reload them.
If built-in measurement is unavailable, or you need to use existing files, import compatible REW text exports containing frequency, magnitude, and phase, or mono impulse-response WAV files. A suitable imported IR can provide RT60, but ordinary response exports do not carry DecayCore’s full session data, including the separate harmonic curves. See Measurement for platform support, subwoofer routing, and export requirements.
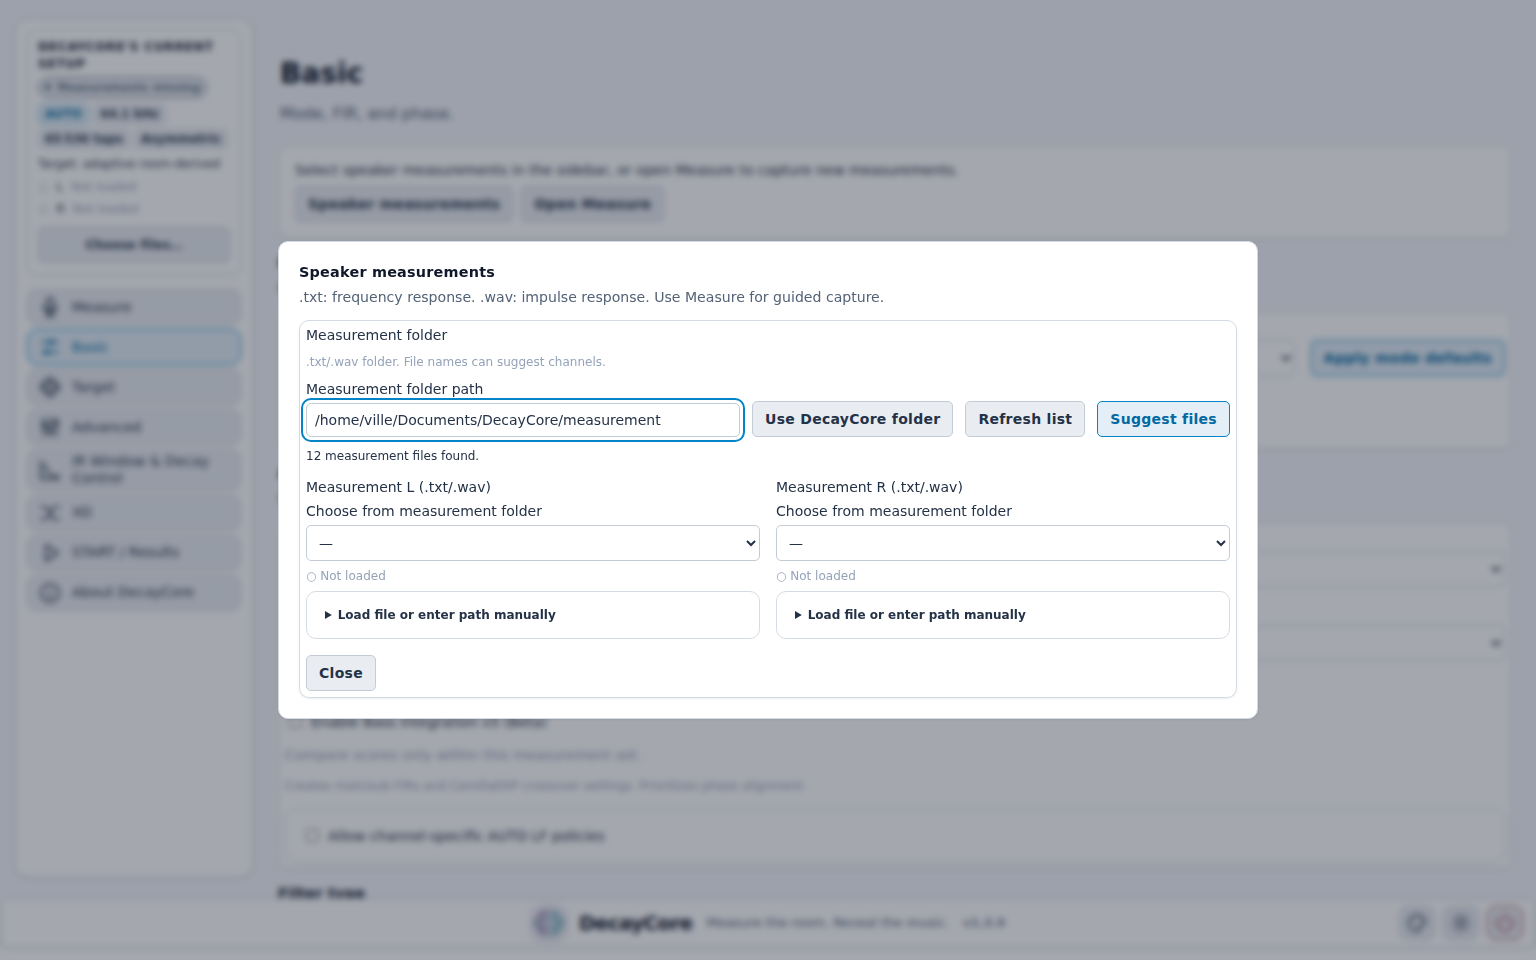
Open Choose files… in the sidebar and select the Left and Right files in the window. You can choose from the measurement folder, use Suggest files, or expand Load file or enter path manually to upload files or enter their paths. Check the channel assignments and the file names shown in the sidebar before starting. To replace loaded measurements, use Change files….
3. Start with Automatic mode
For a first run in a packaged release:
- Mode: DecayCore automatic mode (recommended)
- Filter type: Asymmetric
- AUTO goal: balanced
- Target strategy: Adaptive: derive target from room acoustics
- Max boost: leave the default conservative limit
Automatic mode tries several presets within safety limits and ranks the results. Leave the boost limit alone for now. A deep dip can tempt you into adding another few decibels, but a cancellation is remarkably unimpressed by amplifier effort. Speaker placement, crossover changes, or room treatment are usually more useful there.
Source checkouts do not include the packaged Automatic mode engine. Use Basic for a conservative manual starting point when running from source.
4. Generate and inspect
- Open START / Results and press START.
- Wait for the run to finish.
- Review warnings, the selected solution, response plots, and the summary.
- If a critical health check appears, correct its cause before exporting.
5. Export and load the filters
Download the result ZIP or open the output folder shown on the results page. It contains convolution-ready WAV filters and supporting configuration files.
- CamillaDSP: use the generated YAML or load the left and right WAV files into convolution filters.
- Roon: load the ZIP or compatible WAV set in Convolution.
- Equalizer APO: use the Convolution filter and leave enough preamp headroom.
6. Listen and optionally verify
Start at a low volume with those familiar recordings. Can you follow the bass line through the busy passages? Does a voice still have its body? Is the centre image where you expect it? Listen for tonal balance, bass integration, clarity, and anything that now sounds unnatural.
Compare with bypass at the same volume. A louder result will often seem better. The volume knob has won enough unfair comparisons already.
Use a few different records before making up your mind. One beautifully recorded acoustic guitar cannot speak for your entire collection. If the filter sounds worse, go back and change it; the plots can help you work out why.
DecayCore does not include exported filters in its own measurement path. Measuring with correction active is possible only if you route the sweep through your convolver. If you are not sure how to do that, skip the verification measurement and trust the listening test.
Next steps
- User Manual — settings, outputs, deployment, and troubleshooting
- Reading DecayCore Output — result graphs and summary fields
- How DecayCore works — correction principles and technical references